
I finished translating the first of the patterns found at Hendes Verden. I figure you really only need one of the patterns – you can adapt it quite easily – so I’m not going to translate the other one. The only real difference between them is the flower on the second one and you can just use any large-ish flower pattern instead.
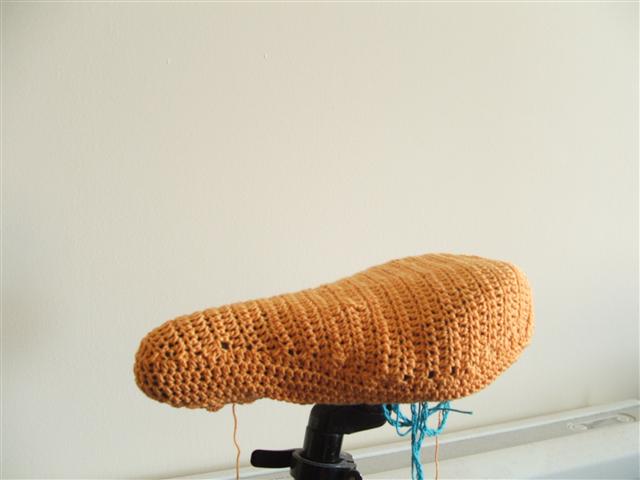
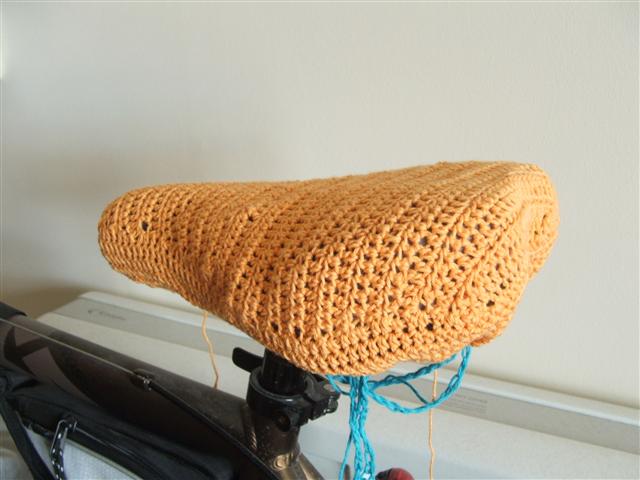
Doesn’t Tony’s bike look prrrrrretty? I couldn’t be bothered to cut off the loose ends. Oh well. ;-) Here is the pattern – I hope it makes sense. If it doesn’t, well, tough bananas! Only joking. If it’s completel gobbledygook, please email me or leave a comment… :-)
PS – Now there is also a French translation – head over to Potiron Blogue!
Please Note: I wrote this in 2009. I do very little crochet these days so I am not able to help with these instructions.
Bicycle Seat Cover
– translated from the original pattern in Danish found here at Hendes Verden magazine
Hook size: 3
Gauge: 19/20 hdc on hook no. 3 = 10cm
accessories: 65 cm button hole elastic or similar, 1-2 buttons
Chain 25,
hdc in 3rd ch from hook (2ch counts as first hdc), hdc in rest of ch stitches, but 2 hdc in last stitch
ch 2 (counts as first hdc), hdc in same stitch, hdc in the rest of stitches, but 2 hdc in last stitch – continue this increase (2 stiches in the beg. and end stitches) until there are 39 stitches.
Work the next 6 rows without the increase. Meaning: ch 2 that counts as first hdc, hdc in all other stitches along the row.
Now we start decreasing!
For the next 3 rows work 2 tog at each end, the rest is as before, 1 hdc in each stitch
After these 3 rows you should have 33 stitches along
(if you’re wondering how to do 2tog with a ch stitch; this is how I do it: instead of making 2 ch stitches, do just 1 and then do the following hdc as usual – I don’t know if this is the right way, but hey, if it works..)
For the next 2 rows work 3tog at each end, the rest is as before, 1 hdc in each stitch
After these 2 rows you should have 25 stitches along
For the next 2 rows work 2tog at each end, the rest is as before, 1 hdc in each stitch
After these 2 rows you should have 21 stitches along
Next row: no increase
Next row: work 2tog at each end, the rest is as before, 1 hdc in each stitch = 19 stitches along
Next 3 rows: no increase
Next row: work 2tog at each end, the rest is as before, 1 hdc in each stitch = 17 stitches along
Next row: no increase
Next 4 rows: work 2tog at each end, the rest is as before, 1 hdc in each stitch = 9 stitches along
Bind off. That is the top of the seat done.
The edging:
Attach the yarn in the middle of the back (the very first row of the work) with 1 crochet stitch, ch 2, work approx 72 hdc all the way around (this depends on the size of the circumference; you might need more or less than 72, but it should be a number that is divisable with 5 and 2 and will result in an even number of ‘holes’ – made later on), finish the row with sl st in the 2nd ch.
Work another 6 rows of hdc in the same way
Work one row like so:
Ch 5, * skip next 2 st, 3dc, ch2 *, repeat from * to * for the rest of the row and finish with 2ch in 3rd of first chain.
Last row!
Ch 1, 2 sc in each ch sp, 1 sc in each dc, finish with 1 ch into the first sc. Bind off.
To finish
The original pattern tells you to use trouser elastic (through the holes) to keep the cover tight on your seat.
I suggest this instead: crochet a chain that is as long as the circumference of the cover, pull it through the holes and tie with a bow when you’ve places the cover on the seat. You can even make this cord thicker by doing dc’s all the way back through your chain. But that is only if you can be bothered.
Decorate the back end of cover with crochet flowers if you feel like it. Or you can make the cover stripy by changing the colours.
