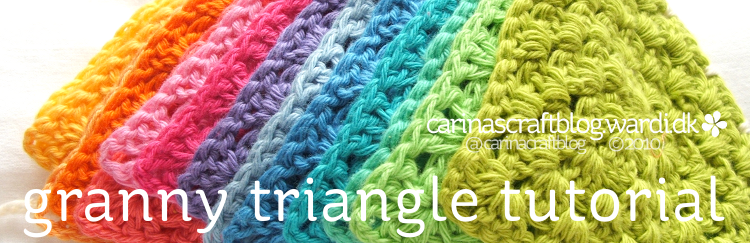
So! Here we go with the granny triangle tutorial. Did you master the magic circle yet? Ready to go? By the way, this is the yarn I use.
If you don’t fancy using the magic circle, you can make a ring by making 4 chain stitches and joining them into a ring. Please note, I am using the American crochet terms in this tutorial. :-)
July 2012 – Please note: my interests have changed and I do very little crochet these days. I’m sorry I do not have the time to answer emails about help with crochet. Try the Ravelry site for help instead. Thank you for understanding. :-)
Please respect my copyright. Please do not copy this tutorial and post it on your own site or blog in any form. This includes translations of the tutorial. Please respect the time and effort that goes into writing and photographing a tutorial. If you see this tutorial posted on someone else’s site or blog in any form, please let me know. Thank you. Happy crafting! :-)
Por favor, respeta mis derechos de autor. Por favor no copies y pongas este tutorial y mensaje en tu blog en ningun formato. Esto incluye traducciones del tutorial. Por favor, respeta el tiempo y esfuerzo puesto en escribir y fotografiar este tutorial. Si ves este tutorial en cualquier tipo de formato en alguna pagina o blog, por favor, dimelo. Gracias. Felices creaciones. :-)
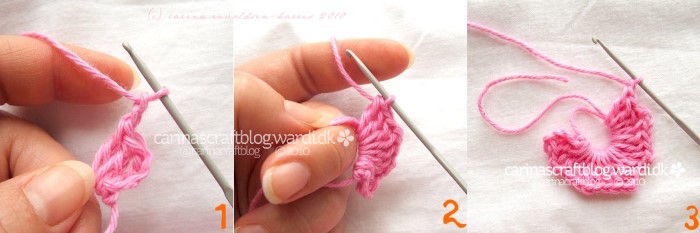
Round 1
Img. 1: Ch3 in the magic circle, counts as first dc, 2dc into circle, ch2, 3dc, ch1, 3dc, ch2, 3dc, ch1, 3dc, ch2, 3dc, ch1, join into top of chain.
Img. 2: notice how I am holding the ring? It actually makes it easier to hold onto the work at this stage.
Img. 3: When you get to the end of the round you should pull tight the magic ring if you are using it. But don’t cut off the ‘tail’ – you may need it later.

Img. 4: See how that’s all neat and tight?
Img. 5: Once you have joined the round, slip stitch through the stitches between the join and the first ch2 space, make sure to crochet into both the front and back of the stitches.
Img. 6: when you get to the ch2 space, make a slip stitch around the chain.
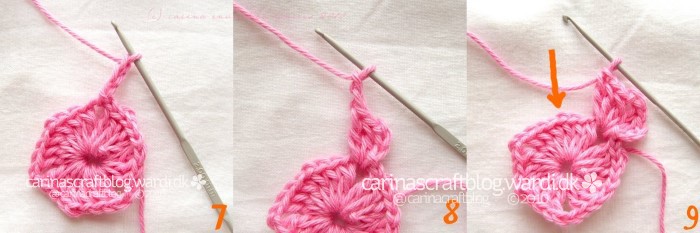
Round 2
Img. 7: chain 3, counts as first dc.
Img. 8: 2dc in the corner/ch space, ch2, then 3dc in the corner.
Img. 9: find the ch1 space from the last round – sometimes a bit tricky to find..
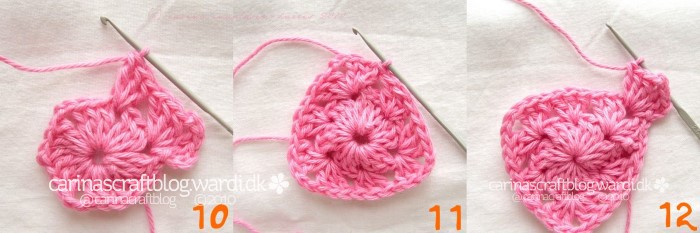
Img. 10: 3dc into the ch1 space, then repeat the following sequence twice: 3dc in corner, ch2, 3dc in corner, 3dc in ch1 space.
Img. 11: if you got the sequence right, you should now be at the end of the round, join with ch3 and then slip stitch through the stitches to the corner.
Round 3
Img. 12: chain 3, counts as first dc, 2dc in the corner/ch space, ch2, then 3dc in the corner.
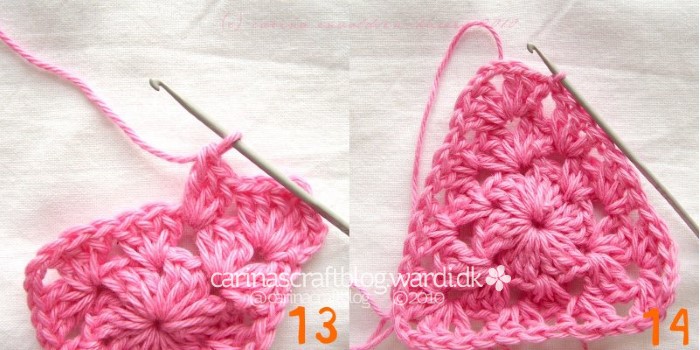
Img. 13: 3dc the space between two 3dc groups from the last round, then 3dc in the next space. Then repeat the following sequence twice: 3dc in corner, ch2, 3dc in corner, 3dc in space, 3dc in space.
Img. 14: join with ch3 and that’s your triangle!
You can of course add more rounds if you want a larger triangle! As you’re working, the centre of your triangle may start becoming a bit loose, but that’s ok, just use that ‘tail’ to pull the magic ring tight again.
Next, stay tuned for what I used my triangles for – it’s fun and colourful! :-)
Thank you for posting this! I'm so excited to start crocheting some cute triangles. :D :D
Thanks for sharing your tutorial!
Really sweet ones!! Thank you for sharing!
Thank you – glad you like it! :-)
This tutorial was fun and easy to follow. Thank you so much for sharing. I can see how making these little triangles can become addicting!
Love this! Thank you for an awesome tutorial, I've never thought about doing these triangular before but now I'm keen to try!
Gorgeous colours as well
i stumbled upon your blog when I searched for flower bunting crochet. I am about to make some buntings to hang my earrings collections and I thought your pattern would be an awesome start for me to learn to make triangle buntings. :)
thank you so much..
hugs
dee